An accounts payable ledger can look clean while hiding problems that affect the books. A vendor credit may not be applied, an invoice may be posted to the wrong account, or a bill may remain open even after payment. These small gaps can make month-end close harder and leave finance teams with balances that don’t match vendor statements. NetSuite accounts payable gives businesses a central place to track these transactions and keep vendor records up to date.
But knowing where to enter a bill is only one part of the process. AP teams also need to understand how bills flow through approvals, how payments affect the general ledger, and how to spot errors before they carry over into the next period. This blog walks through the key steps, features, reports, and best practices for managing accounts payable in NetSuite.
What You Will Learn From This Blog
- What NetSuite accounts payable management means and how it works.
- Key features that help teams manage vendor bills and payments.
- How to manage the full AP process, from vendor setup to payment.
- Which NetSuite reports help track unpaid bills and vendor balances.
- Common AP issues and ways to prevent them.
- How expert support can improve NetSuite payable accounting and AP controls.
What Is NetSuite Accounts Payable Management?
NetSuite accounts payable management is the process of tracking and paying money a business owes to its vendors through NetSuite ERP. It covers key tasks such as adding vendor records, entering bills, setting payment terms, approving invoices, and recording payments.
When a vendor sends an invoice, the AP team records it as a bill in NetSuite. The system posts the amount due to the accounts payable account in the general ledger. Once the bill is paid, the payment is recorded, and the open balance is reduced.
For example, if a company receives a $5,000 invoice for office supplies on 30-day terms, it records the bill when the cost is incurred. The company then pays the vendor by the due date and records the payment against that bill.
This process helps keep vendor balances, cash records, and financial reports in sync.
NetSuite payable accounting also links AP activity with other parts of the finance process. For example, a bill may affect expense accounts, inventory, tax records, cash flow, and the general ledger. This link helps finance teams review the full impact of each purchase.
Key Features of NetSuite Accounts Payable
NetSuite has several features that help businesses manage vendor bills and keep AP records up to date.
1. Vendor Bill Management
Teams can create vendor records with key details such as contact data, payment terms, tax details, and bank information. When a bill arrives, the AP team can link it to the right vendor and enter the invoice date, due date, amount, and expense or asset account.
This gives the team one place to view open bills and past payments.
2. Invoice Approval Workflows
NetSuite can route bills for review based on set rules. For example, a bill above $10,000 may need approval from a finance manager, while a smaller bill may only need approval from a team lead.
These rules help prevent unapproved bills from moving to payment.
3. Vendor Payment Processing
Teams can track due dates and select bills for payment. NetSuite supports payment workflows based on the company’s setup and enabled features, which may include checks, electronic payments, or other payment methods.
4. AP Aging and Reporting
AP aging reports show how long bills have been unpaid. Teams can use these reports to find overdue bills, plan cash needs, and follow up on payment issues.
5. Multi-Currency Support
Businesses that work with vendors in other countries can record bills and payments in more than one currency, subject to their NetSuite setup. The system can track exchange rates and currency gains or losses.
optional anymore
on running the business
How to Manage NetSuite Accounts Payable: Step-by-Step Process
A clear process helps teams enter bills on time, avoid errors, and pay vendors based on agreed terms. Here’s how to manage NetSuite accounts payable from start to finish.
Step 1: Set Up Vendor Records and Payment Details
Start by adding each vendor to NetSuite. Enter the legal name, contact details, tax data, payment terms, currency, and payment method.
Check the vendor’s bank details before saving them. If a vendor changes its bank account, confirm the change through a trusted contact before updating the record.
Also, check for duplicate vendor records. Two records for the same vendor can lead to split balances, duplicate bills, and payment errors.
Step 2: Receive and Enter Vendor Invoices
When an invoice arrives, review it before adding it to NetSuite. Check the vendor name, invoice number, date, amount, tax, and payment terms.
Next, create a vendor bill and enter the right details. Link the bill to the correct expense, asset, or inventory account. Add a department, class, or location if your company uses these fields for reporting.
Attach the invoice to the bill record when possible. This gives reviewers a clear record to check before approval.
Example: A company gets a $3,000 invoice for office rent. The AP team records the bill with the correct vendor, rent expense account, and due date. This helps ensure the cost appears in the right period.
Step 3: Match Vendor Bills With Purchase Orders and Receipts
For businesses that use purchase orders, compare the vendor bill with the purchase order and proof of receipt.
This check helps confirm that:
- The business placed the order.
- The goods or services were received.
- The vendor billed the agreed price.
- The billed quantity matches the order and receipt.
For example, if a company ordered 100 units at $20 each but the vendor bills for 120 units, the AP team should review the difference before approval.
This step helps prevent overbilling and payment for goods that were not received.
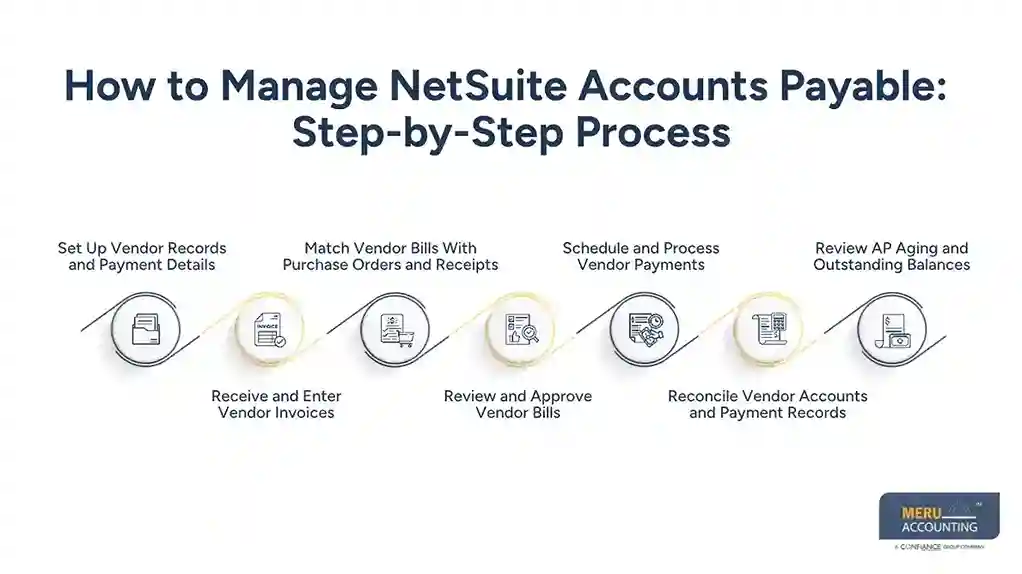
Step 4: Review and Approve Vendor Bills
Once the bill is entered and checked, send it through the approval process. The reviewer should check the amount, account code, vendor details, supporting files, and purchase terms.
Set approval limits based on roles and bill value. For example, a team lead may approve bills up to $5,000, while larger bills may need a finance manager’s approval.
Keep bill entry and payment approval separate where possible. This gives the business better control over cash and helps reduce the risk of fraud.
Step 5: Schedule and Process Vendor Payments
After approval, review the due date and payment terms. Select bills for payment based on the due date, available cash, and any early payment discounts.
Before sending funds, check:
- Vendor bank details.
- Approved bill amount.
- Payment date.
- Payment method.
- Any credit notes or past payments.
Once the payment is made, record it against the right bill in NetSuite. This helps reduce the open balance and keeps the vendor account up to date.
Step 6: Reconcile Vendor Accounts and Payment Records
Compare vendor statements with the bills and payments in NetSuite. Look for missing bills, payments not yet applied, credit notes, and differences in balance.
Also, check that payments in the accounting records match bank activity. If a payment appears in the bank but not in NetSuite, find out why before closing the period.
Regular checks help keep AP balances correct and make month-end close easier.
Step 7: Review AP Aging and Outstanding Balances
Run an AP aging report to see which bills are due and which are overdue. Review the report by vendor and due date.
Pay close attention to old balances, disputed bills, and invoices that have been on hold for a long time. Find out why they remain open and assign each issue to the right team member.
This review helps finance teams plan cash needs and avoid late fees or strained vendor ties.
NetSuite Accounts Payable Reports Every Business Should Monitor
Reports help finance teams review open bills, spot errors, and plan payments. The right reports also support better NetSuite payable accounting and month-end close.
Report | What It Shows | Why It Matters |
AP Aging Summary | Open bills by age range | Helps track overdue amounts |
AP Aging Detail | Bill-level due dates and balances | Helps find old or unpaid bills |
Vendor Balance Summary | Amount owed to each vendor | Helps review vendor balances |
Open Bills Report | Bills that are not yet paid | Helps plan payments |
Payment History | Past payments and related records | Helps review payment activity |
Businesses should review these reports on a set schedule. Weekly AP reviews help teams plan payments, while month-end checks help confirm that open bills and vendor balances are correct.
Common NetSuite Accounts Payable Challenges and How to Resolve Them
Even with a well-set system, AP teams may face issues. Here are some common problems and ways to address them.
Common Challenge | Why It Happens | How to Resolve It |
Duplicate vendor invoices | No check for repeat invoice numbers | Set duplicate checks and review invoice records before approval |
Wrong bill coding | Bills are linked to the wrong expense or asset account | Use clear coding rules and review high-value bills |
Late invoice approval | Approval roles are not clear or reviewers are slow | Set approval limits and assign backup reviewers |
Payment errors | Wrong bank details or payment amount | Verify vendor data and check payment batches |
Vendor balance mismatch | Missing bills, credits, or payments | Compare vendor statements with NetSuite records |
Old unpaid bills | Bills are on hold or were missed | Review AP aging and assign follow-up tasks |
A key part of good NetSuite accounts payable management is finding the cause of each issue, not just fixing the same error each month. Regular reviews and clear team roles can help stop these problems from coming back.
NetSuite Payable Accounting Services by Meru Accounting
A vendor bill isn’t ready for payment just because it’s been entered in NetSuite. Someone still needs to verify the amount, check the account coding, review supporting documents, track approval status, and make sure the payment is applied to the right bill. These details matter even more when a business handles hundreds of invoices across multiple vendors, departments, and locations.
At Meru Accounting, we provide NetSuite accounts payable support that covers these day-to-day tasks as well as the accounting checks behind them. Our services include:
- Vendor and Bill Management: Vendor record maintenance, bill entry, invoice coding, and duplicate bill checks.
- Invoice Review and Approval Support: Checking invoice details against purchase orders, receipts, and approval rules.
- Payment Management: Reviewing bills due for payment, checking payment records, and tracking outstanding vendor balances.
- Vendor Reconciliation: Comparing vendor statements with NetSuite records and resolving differences.
- AP Reporting: Reviewing aging reports, open bills, and unpaid vendor balances.
- Month-End AP Support: Checking AP balances, reviewing cutoff entries, and helping ensure expenses are recorded in the right period.
Whether you need help with invoice processing, vendor reconciliation, or ongoing NetSuite payable accounting, Meru Accounting can provide a dedicated team at a fraction of the cost of maintaining a comparable in-house team.
Our Expert Insight
One area we pay close attention to in NetSuite accounts payable is the handling of vendor credits. A credit memo may be recorded correctly but left unapplied to the original bill. As a result, the AP aging report may still show the full invoice amount, even though the vendor has already issued a credit.
For example, if a vendor issues a $2,000 credit against a $10,000 bill, the remaining amount due is $8,000 once the credit is applied. We recommend reviewing unapplied credits before each payment run and as part of the month-end AP review. This simple check helps prevent overpayments and keeps vendor balances accurate.
Key Takeaways
- NetSuite accounts payable helps manage vendor bills, approvals, payments, and open balances.
- Accurate vendor records are the base of a sound AP process.
- Matching bills with purchase orders and receipts helps prevent overbilling.
- Clear approval rules reduce payment risk and errors.
- AP aging reports help track due dates and plan cash needs.
- Vendor statement checks help find missing bills and payment gaps.
- Month-end cutoff checks help keep expenses in the right period.
- Expert support can help businesses manage AP tasks and keep records up to date.
FAQs
NetSuite accounts payable tracks vendor bills, approvals, payments, and outstanding balances. It also updates the general ledger as bills and payments are recorded.
Go to Transactions > Payables > Enter Bills, select the vendor, and enter the invoice number, date, amount, and expense details. Save the bill and submit it for approval.
Yes. NetSuite supports invoice capture, approval workflows, payment processing, and AP reporting. Some automation features may require additional tools or setup.
Common causes include unposted bills, incorrect account coding, unapplied vendor credits, and transactions recorded in the wrong period. Review the AP detail and GL impact to find the difference.
Review unpaid bills, vendor credits, and payment records. Reconcile the AP balance with the general ledger and check that expenses are recorded in the correct period.
optional anymore
on running the business