
Running a Shopify store can get busy fast, and bookkeeping is often the last thing you want to deal with after a long day of filling orders. But when sales, refunds, and payment fees don’t match your bank deposits, closing the books can turn into a time-consuming task. A proper Shopify accounting integration helps keep these records in sync and gives you a clearer picture of your store’s finances.
Setting it up takes more than connecting two accounts. You need to choose the right tool, map transactions to the right accounts, and check that sales and payouts match your records. Here’s how to set up the integration and keep your books accurate without adding more work to your day.
In this blog, we explain how to set up the link, choose the right tools, avoid common errors, and keep your books ready for tax time.
What You Will Learn From This Blog
- How Shopify accounting integration works and why it matters.
- What to check before you link your store to accounting software.
- How to set up the link and test your first sync.
- How Shopify third-party accounting integrations differ from direct links.
- How to handle sales, fees, refunds, taxes, and payouts.
- When expert accounting help can improve the accuracy of your books.
What Is Shopify Accounting Integration and How Does It Work?
Shopify accounting integration links your online store with accounting software or an app that sends store data to your books. Depending on the tool and its settings, it may sync orders, refunds, payment fees, taxes, and payout details.
Without this link, you may need to enter sales by hand or use spreadsheets to compare Shopify reports with bank deposits. An integration can cut down on this work and help keep records in one place.
Here is a simple example. A customer buys $100 worth of goods. The payment provider takes a $3 fee, so your bank gets $97. Your books should show the $100 sale, the $3 fee, and the $97 payout. If you record only the bank deposit as sales, your income will be too low.
The exact flow depends on your payment provider and setup. Some tools sync each order, while others group sales by day or payout. Check how your app records each item before you rely on it for month-end reports.
optional anymore
on running the business
Why Does Your Shopify Store Need Accounting Integration?
As order volume grows, manual entry can take more time and lead to more errors. A good setup helps you keep track of the money your store earns and the costs tied to each sale.
Key benefits include:
- Less manual work: Cut down on data entry and the need to copy sales reports into your books.
- Better sales records: Track gross sales, discounts, returns, and refunds with less guesswork.
- Clear payment fees: Record fees charged by Shopify Payments or other payment providers as expenses.
- Easier bank matching: Match payouts to bank deposits instead of treating each deposit as a new sale.
- Better tax records: Keep sales tax data and other records ready for review.
- Stronger cash flow insight: See what has been paid, what is still due, and what costs are eating into your cash.
An integration does not fix every accounting issue on its own. Wrong account mapping, missed refunds, or duplicate entries can still lead to bad reports. You need to review the data and check that it matches your source records.
What to Prepare Before Connecting Shopify to Your Accounting Software
Before you set up Shopify accounting integration, take time to review your store data and accounting settings. A clean start makes it easier to spot errors and avoid duplicate records.
- Choose your accounting software: Decide whether you will use QuickBooks Online, Xero, or another tool that fits your business. Check that it supports the data you need, such as sales, fees, refunds, and payout records.
- Review your current books: Check your opening balances, chart of accounts, unpaid bills, and past sales entries. If you already enter Shopify sales by hand, decide how you will prevent the same transactions from being added twice.
- Gather access details: Make sure you have the right access to your Shopify store, accounting software, and any payment apps you use. Review the permissions the integration requests before you approve the link.
- Check your payment setup: List each payment method you accept, such as Shopify Payments, PayPal, or other gateways. Each may have its own fees, payout schedule, and refund process.
- Set your accounting rules: Decide how to record sales, discounts, shipping income, sales tax, payment fees, refunds, and inventory costs. Use accounts that fit your business and match the way you prepare reports.
If your store sells in more than one currency, also check how the tool handles exchange rates and currency gains or losses. These details can affect your books even when the sales data syncs without errors.
How to Set Up Shopify Accounting Integration Step by Step
The exact steps depend on your accounting software and the app you choose. Still, most setups follow the same process.
Step 1: Choose the Right Accounting Software
Start with your business needs, not just the monthly price. Think about order volume, inventory, sales channels, reporting needs, and the number of people who need access.
QuickBooks Online and Xero are common choices for small and midsize businesses. Before you choose, confirm that the software and integration support the features you need. A store with a large number of orders or complex inventory needs may need a more advanced setup than a store with a few sales each day.
Step 2: Pick a Direct Link or an Integration App
Check whether your chosen accounting software offers a direct Shopify connection or supports an approved app. A direct link may suit basic needs, while an app may offer more control over how sales, fees, taxes, and payouts are sent to your books.
Do not assume every tool syncs every type of data. Review the feature list, sync schedule, supported payment providers, and limits before you connect your store.
Step 3: Connect Your Shopify Store
Open the app or connection setup page and follow its steps to link your Shopify store and accounting account. Sign in to the right accounts and review the permissions before you approve access.
Once connected, check that the app shows the correct store and accounting company. If you run more than one store, make sure you do not link sales to the wrong set of books.
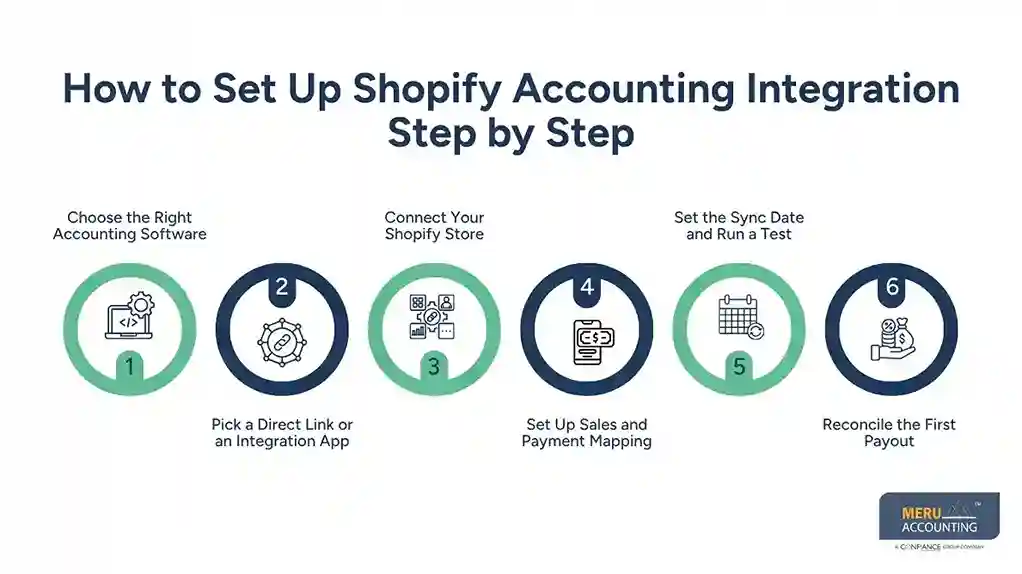
Step 4: Set Up Sales and Payment Mapping
This step helps make sure each transaction lands in the right account. Review how the app records:
- Sales and shipping income
- Discounts and returns
- Payment processing fees
- Sales tax collected
- Refunds and chargebacks
- Clearing accounts and bank payouts
For example, payment funds may first go into a clearing account before they reach your bank. The payout can then be matched against that account, with fees and refunds recorded in the right places. The exact entries depend on your payment flow and accounting method.
Step 5: Set the Sync Date and Run a Test
Choose a start date that fits your existing books. Importing too much past data may create duplicate entries if you have already recorded those sales. Starting too late may leave gaps in your records.
Run a small test with a few orders, a refund, and a payout if possible. Check the entries in your accounting software against Shopify’s order and payment reports. Look for missing data, duplicate sales, wrong tax amounts, or fees posted as income.
Step 6: Reconcile the First Payout
When the next payout reaches your bank, compare it with the amount shown in your accounting records. The deposit may be lower than gross sales because of fees, refunds, reserves, or other adjustments.
Do not mark the setup as complete just because the sync says it worked. Confirm that the sales, fees, and payout add up and that the bank entry can be matched. Once the test looks right, review the next few syncs before relying on the process for all your sales.
Common Shopify Third-Party Accounting Integrations
Shopify third-party accounting integrations can help connect your store with accounting tools and payment systems. The best choice depends on your sales volume, payment setup, stock needs, and reporting goals.
Here are common options to review:
- QuickBooks Online: A fit for businesses that need core bookkeeping, expense tracking, bank reconciliation, and financial reports. Check the chosen connector’s support for Shopify orders, fees, and refunds.
- Xero: A useful option for businesses that want cloud-based bookkeeping, bank feeds, and clear financial reports. Confirm which Shopify data the app sends and how it handles payouts.
- Shopify integration apps: Some apps send summarized sales data, while others sync order-level details or group transactions by payout. Compare their features before you choose.
- Inventory and order tools: If you sell across more than one channel, a tool that links stock, orders, and accounting may help reduce gaps between sales and cost records.
Before you pay for an app, check its current feature list, pricing, support options, and user reviews. Also confirm how it handles refunds, tax, multiple currencies, and duplicate entries. A tool that works well for one store may not fit another.
The goal is not to send the most data into your books. It is to send the right data in a clear and consistent way so you can trust your reports.
Get Expert Help With Shopify Accounting
Connecting Shopify to your accounting software is one part of keeping accurate books. You also need to check payment records, track stock costs, handle refunds, and make sure your reports match the money that reaches your bank.
At Meru Accounting, we help ecommerce businesses manage their books and accounting needs with support that fits their store, sales channels, and existing systems. Our team can help with:
- Shopify sales and payment reconciliation
- Payment fees, refunds, and chargebacks
- QuickBooks and Xero setup and account mapping
- Inventory records and cost of goods sold (COGS)
- Sales tax records and tax-ready books
- Month-end reports and cleanup of past entries
We work with your current workflow and software where possible, rather than forcing you to change systems that already meet your needs. Our CPA support can also help ecommerce businesses that need more than day-to-day bookkeeping.
Whether you are setting up your first Shopify accounting integration or fixing errors in an existing setup, we can help you build a more reliable process at a fraction of the cost of an in-house US team.
Our Expert Insight
One detail worth checking is how your integration handles sales that fall near month-end. For example, a customer may place an order on September 30, but the payment may reach your bank in October. If your records rely only on payout dates, your monthly sales reports may not tell the full story.
Before relying on automated reports, test how the integration records sales, refunds, and sales tax across accounting periods. Make sure the entries follow your accounting method and match Shopify’s reports. This small check can help prevent errors in your monthly financial statements.
Key Takeaways
- Choose an integration that fits your store, payment methods, and reporting needs.
- Review your chart of accounts and existing entries before syncing data.
- Map sales, fees, refunds, taxes, and payouts to the right accounts.
- Test a few transactions before importing all your sales.
- Match payment reports with bank deposits to catch errors early.
- Review your books each month, even when the sync runs on its own.
FAQs
QuickBooks Online and Xero are popular options. The right choice depends on your order volume, inventory needs, reporting goals, and budget.
Yes, some integrations sync sales tax data to your accounting software. You should still review tax records by state and check that they match your filing needs.
Record payment processing fees as expenses, separate from sales. For example, a $100 sale with a $3 fee results in a $97 payout before any other adjustments.
Some tools support inventory and cost of goods sold (COGS), while others only sync sales data. Check the app’s features to see whether you need a separate inventory tool.
Check the app connection, account permissions, and sync error logs. Before importing missing transactions again, check for existing entries to avoid duplicates.
optional anymore
on running the business